Wondering how to setup your new Instant Pot? Here’s all the information you need to get going!
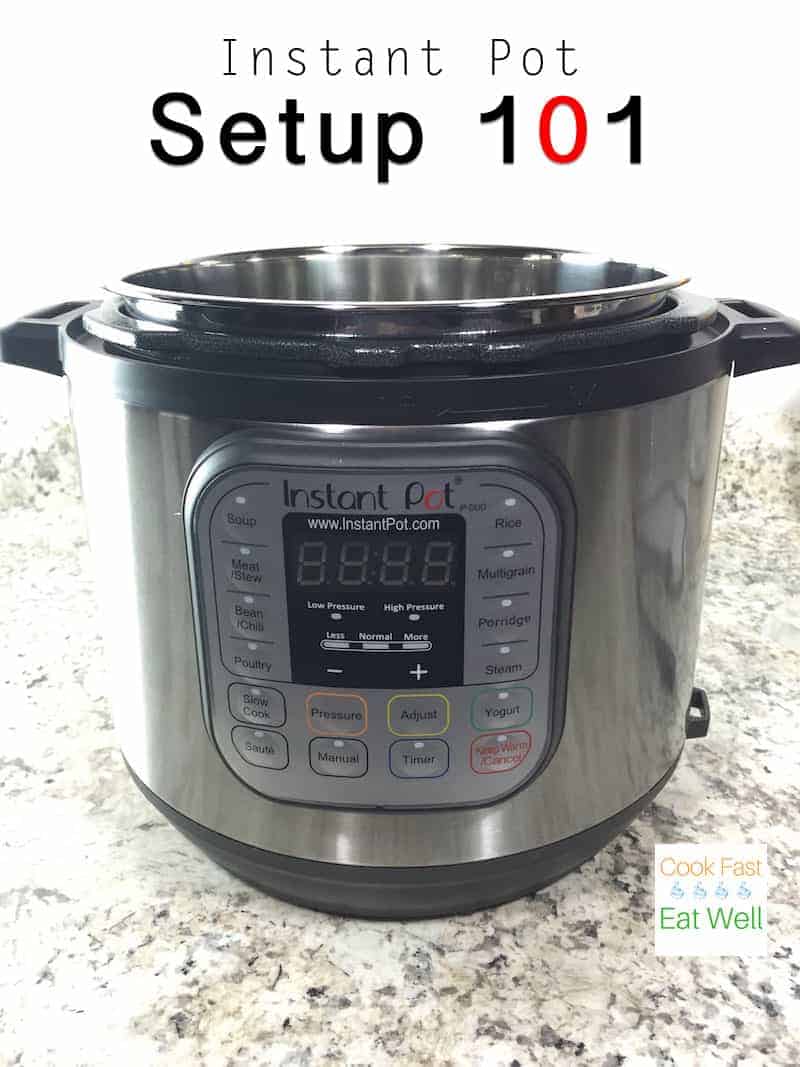
Ready to setup your new Instant Pot DUO? Here’s the step-by-step guide. We’ll look at everything from the manual (snore) to how to conduct the water test. Once you’ve finished the setup, you’ll be ready to start using your Instant Pot!
What an exciting sight. A new Instant Pot! I remember opening my first Instant Pot and thinking, “…and now what?”
To be honest, I found the setup process a little confusing. I (wrongly) thought that the minute I closed the lid and hit the start button, the machine would be under pressure. Here’s everything I wish I knew about setting up and using an Instant Pot.
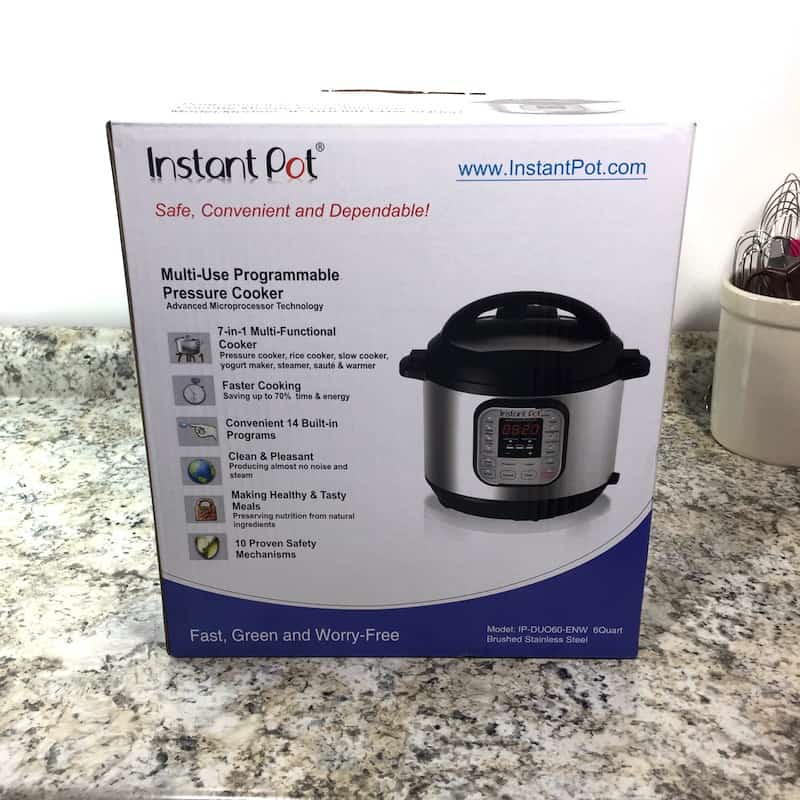
Today we’ll walk through unboxing and setting up a six quart Instant Pot DUO. The basic setup up for the DUO and the Bluetooth Instant Pot is the same. The Instant Pot LUX has a slightly different lid and steam release valve than what you’ll see pictured here.
Note: the links above are affiliate links. If you use them, I earn a small commission from Amazon which supports the site. I only use affiliate links for products that I love, love, love.
Instant Pot Setup: Manuals and Accessories
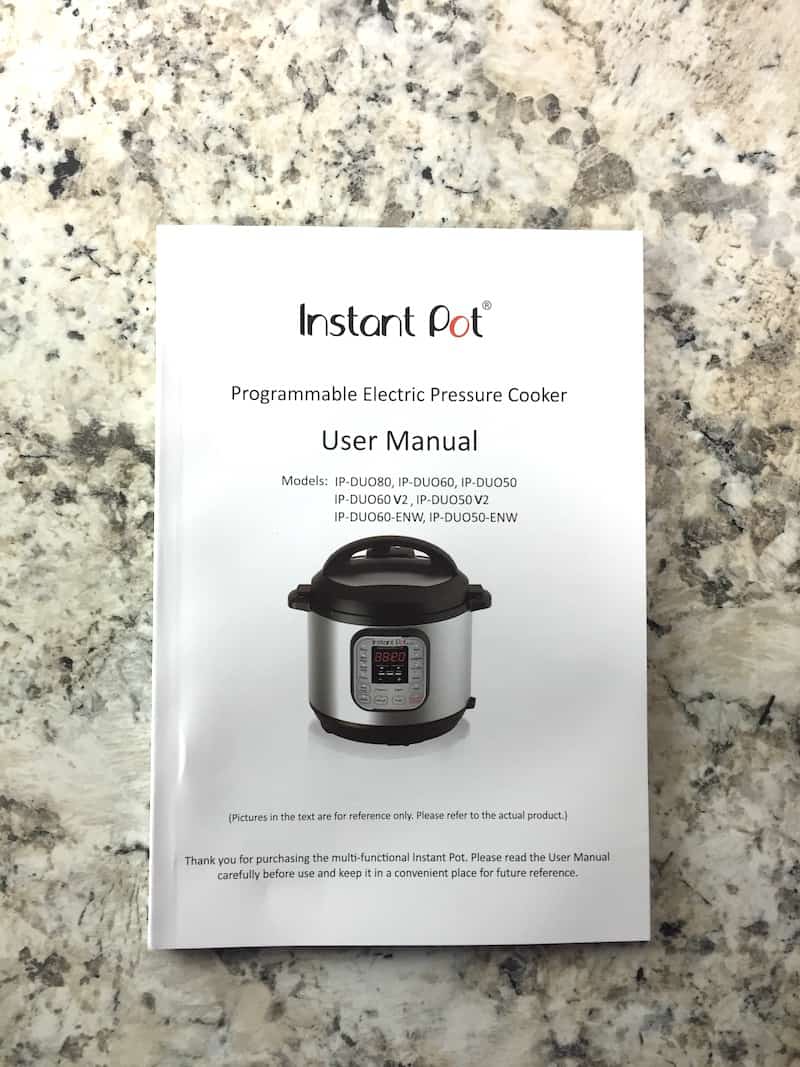
Ah, the manual. Here’s what usually happens with manuals in my house:
- Take it out of the box.
- Flip through quickly.
- Don’t really read it.
- Put somewhere “safe.”
- Never see it again.
- Google the manual when I need some help.
Does that sound familiar? Yes? That’s why we’re friends!
AnyWAY, I know it sounds boring but I urge you to read the Instant Pot manual. Modern pressure cookers are safe. However, they aren’t slow cookers. It’s important to understand the basic ins and outs of a pressure cooker before you use it.
Oh, and if you misplace it, you can find the Instant Pot manual online. (Thank goodness.)

Oh! Recipes! I love recipes. <—understatement. But…I must confess. I’ve never used this recipe booklet. The recipes didn’t really appeal to me and the directions were confusing.
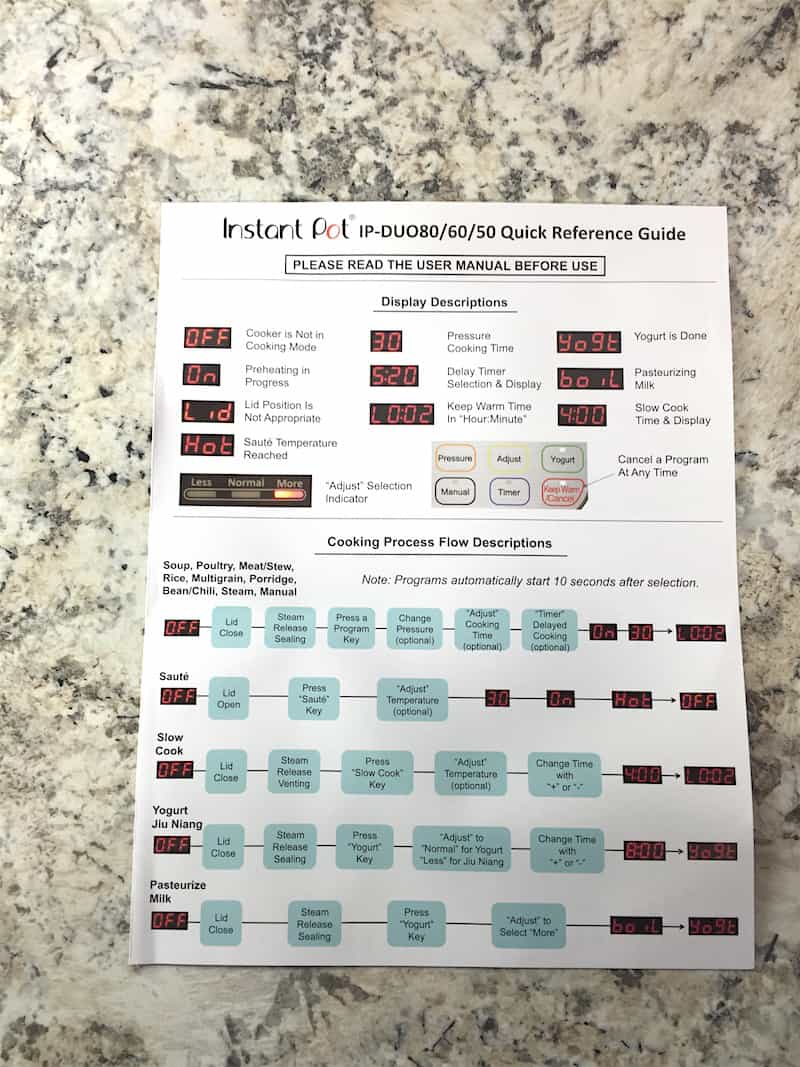
I wish this quick reference guide was handier than it is. As written, it shows the steps for using each function. However, it doesn’t explain cook time or the how to release pressure. I’m very “meh” on this guide. It could be so handy!
Question: do you use the free tools that come with appliances? I don’t think I’ve ever used them! And not just for the Instant Pot. Maybe I’m just weird.
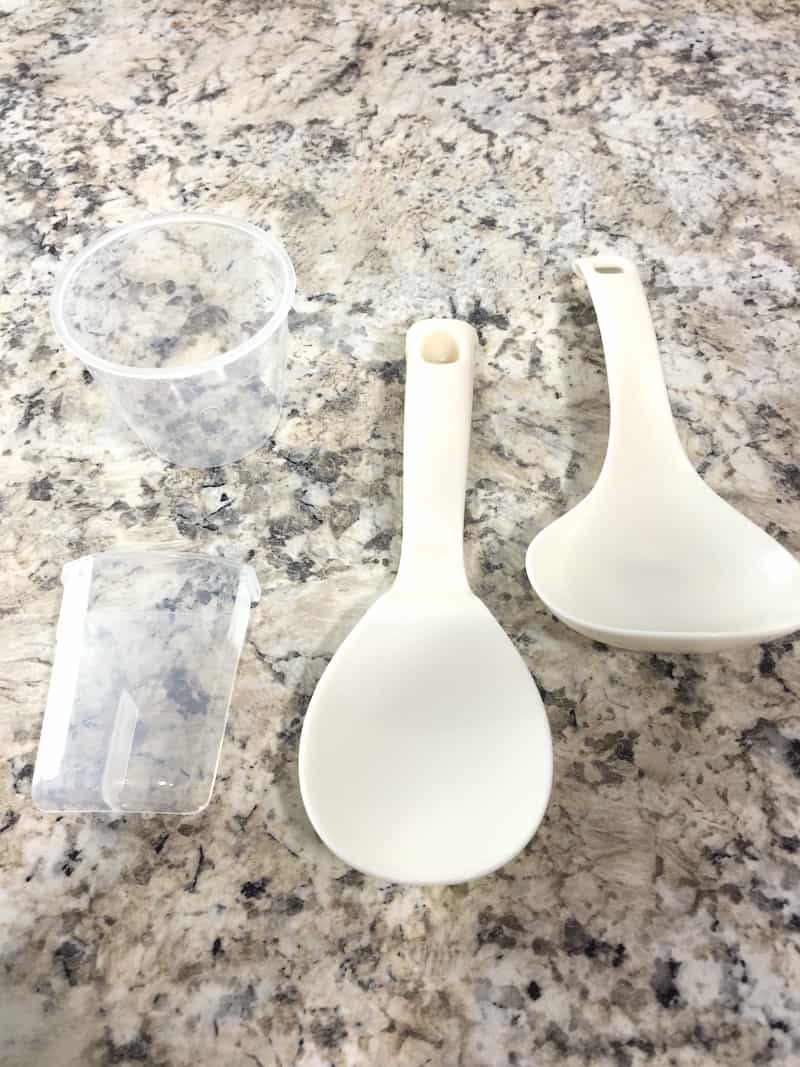
Let’s take a look at these: (clockwise from left) measuring cup, soup spoon, rice paddle, and a condensation collector.
Measuring Cup. If you don’t own a glass measuring cup for liquids, I urge you to get one. This measuring cup is flimsy and, without handle, hard to handle.
Soup Spoon. The handle on this soup spoon is so short that you risk dipping your knuckles into hot food when you use it. Use a regular ladle instead of this spoon.
Rice Paddle. Suffers from the same problem as the soup spoon. The handle feels too short for the pot. A rice paddle this size would fit nicely in a traditional rice cooker. The insert of the Instant Pot is too deep to use this easily.
Condensation Collector. This little cup hooks on to the side of the Instant Pot. It’s supposed to keep condensation from hitting your counter during cooking and cooling. Don’t toss this! I’ll show you how to put it on the Instant Pot below.
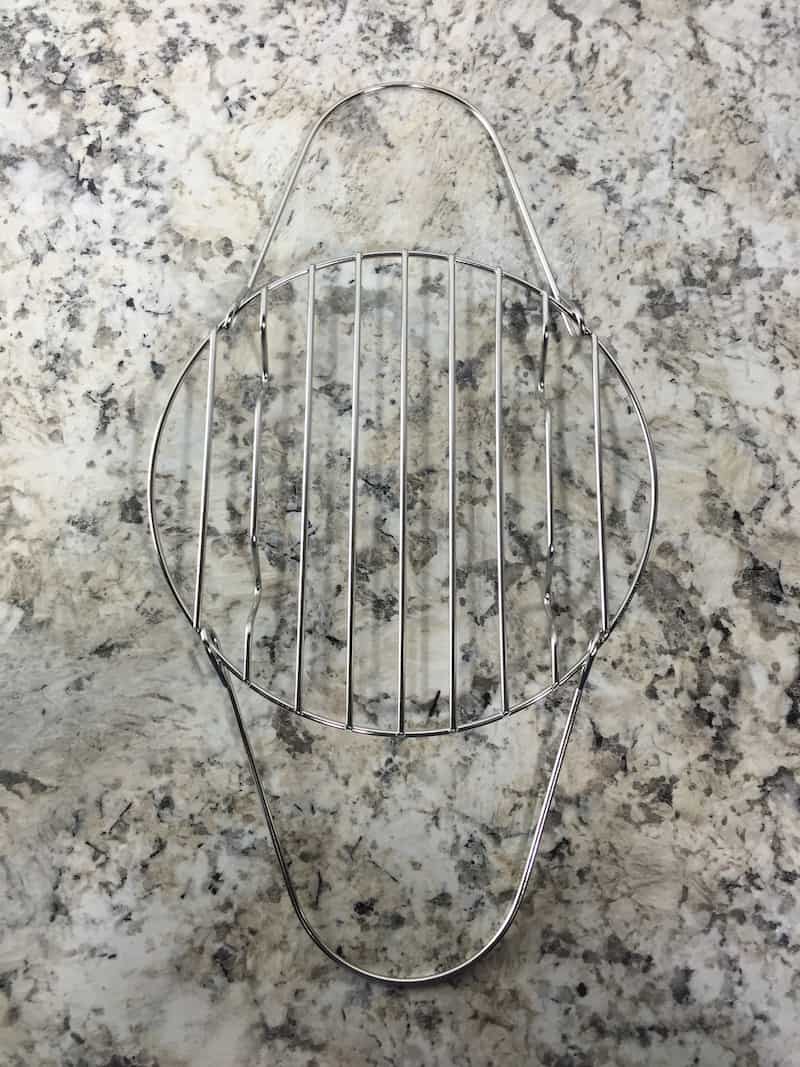
Now here’s a handy accessory! The steam rack. Use this to hold vegetables, pans (for when you make things like meatloaf or cheesecake), or anything else that you don’t want sitting in cooking liquid.
If your model didn’t come with a steam rack, consider getting one. They’re really handy. You might also want to pick up a steaming basket. Small vegetables and other foods tend to fall through the steam rack. To solve this problem, I put the steam rack in the Instant Pot and then I put a steamer basket on top of it.
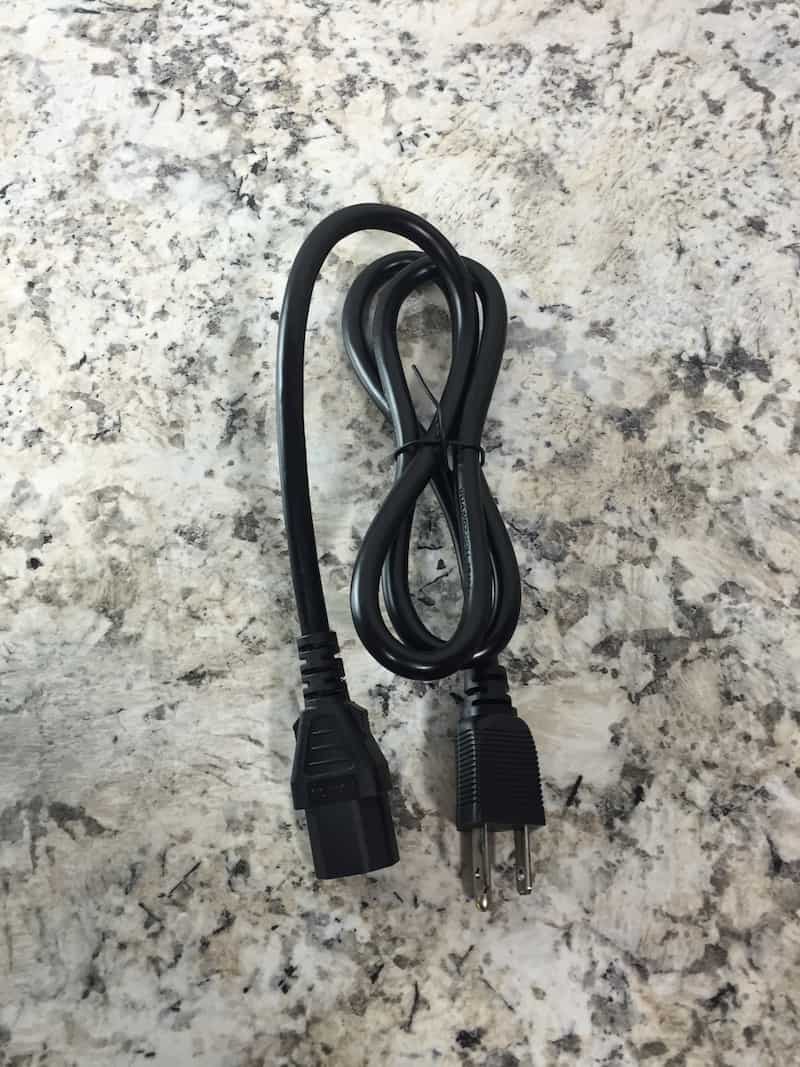
Second generation Instant Pots come with a detachable cord. (They’re fixed on the first generation.) If your cord isn’t detachable, don’t worry about it. In fact, I don’t love the detachable cord. I’m always afraid I’m going to misplace it.
Instant Pot Setup: Understanding the Lid
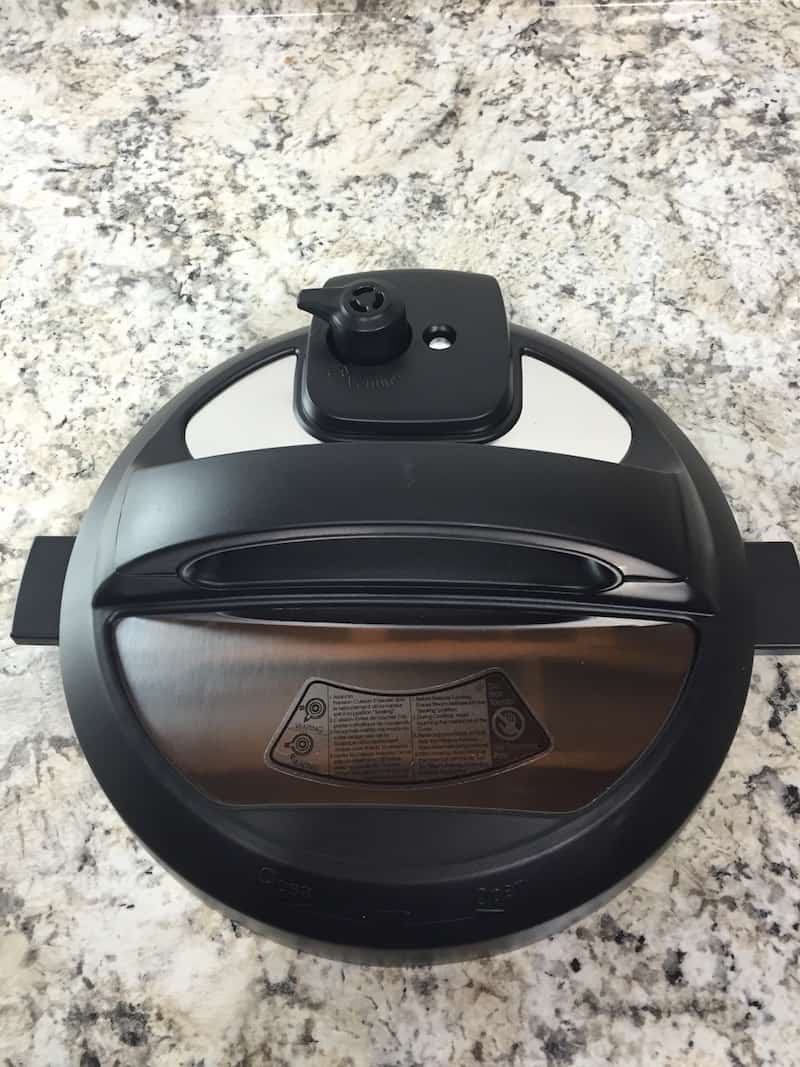
The lid of a pressure cooker is an integral part of the machine. Without this lid, you can’t cook foods under pressure.
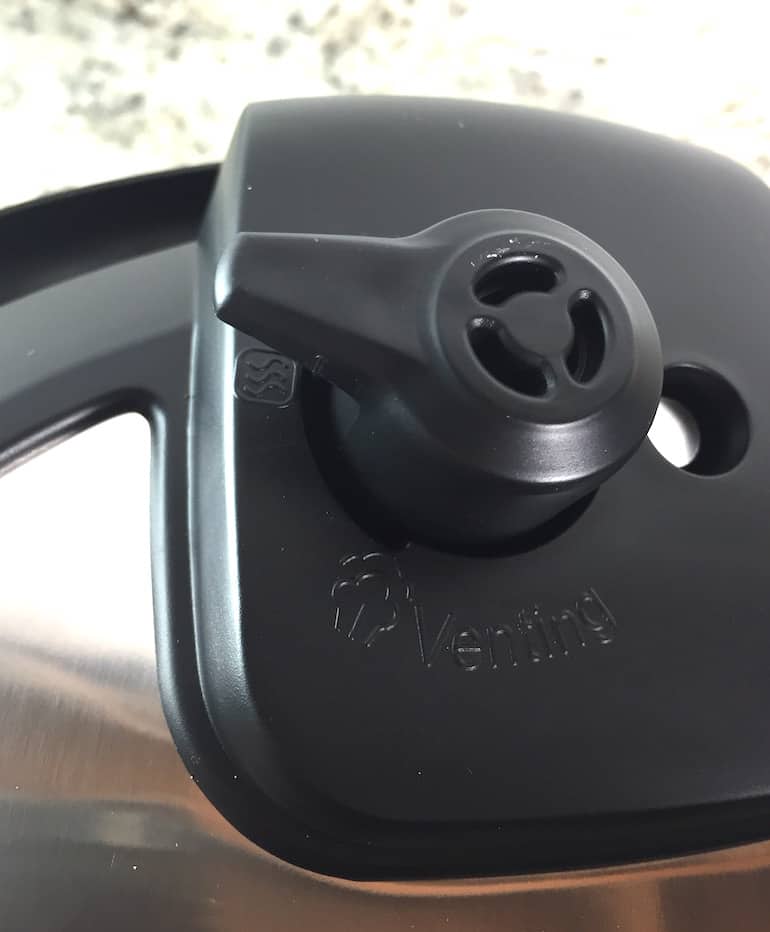
This is the steam release valve. It has two settings: sealing and venting.
Sealing: When cooking food under pressure, close the lid and line up valve with the “wavy” lines. This position seals the pot. It allows pressure to build as the food inside heats and produces steam. The valve won’t lock into place when set to sealing. For safety reasons, it will always wiggle a little.
To set the valve to the sealing position, turn it clockwise as far as it will go. (This is for DUO machines. LUX machines have a different sealing position.)
Venting: Once the pressure cooker completes its cooking cycle, you must vent it. This will either happen immediately after the cooking cycle completes (a quick release) or after the pressure releases slowly over time, about ten minutes. (a natural release.) You MUST vent the pot before opening.
To do that, turn the steam release valve toward venting (icon that looks like a Chef’s hat or puff of steam). NEVER place your hand over the steam release valve. Use the small handle to turn the valve and keep your hand off to the left side. When doing a quick release, steam rushes out of the valve. For a natural release, no steam usually escapes. But it’s a good idea to vent it just in case there’s any pressure remaining.
Unlocked Lid
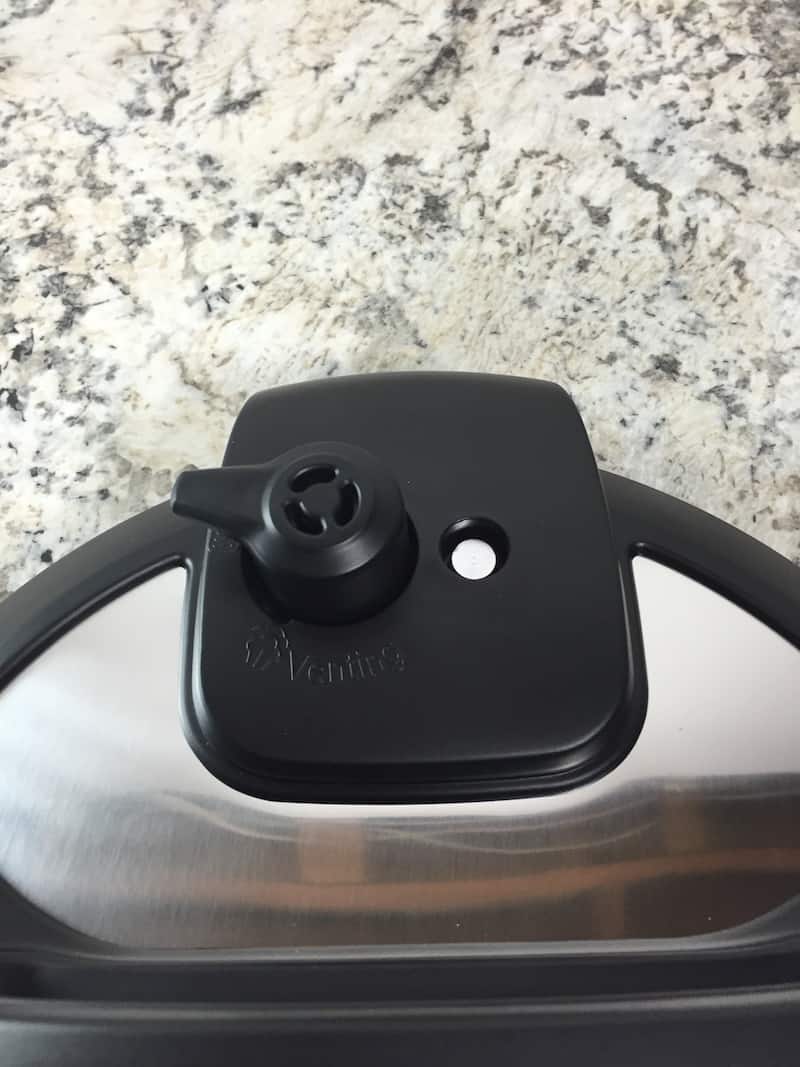
See that little metal valve to the right of the steam release valve? That’s the “float valve.” When the pressure cooker reaches pressure, this valve lifts into place, sealing and locking the pressure cooker.
In the photo above, the float valve isn’t in the lock position. It’s sitting down below the edge of the lid.
You want to get to know the two different positions of the float valve. Here. I’ll show you.
When cooking, the float valve won’t bounce up and down. The steam trapped inside the pot pushes the float valve up and seals the pot. In the video, I’m holding the lid in my hand and lifting and lowering the float valve by tapping it below the lid.
Locked Lid
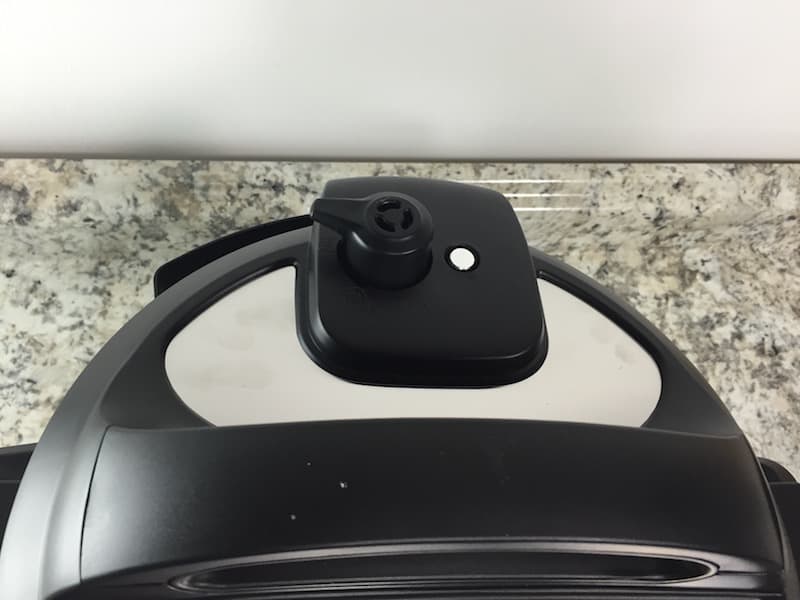
This is a locked lid. The float valve sits flush with the lid. You might be wondering how long the valve takes to lift into place. Good question! The answer is…it depends.
For recipes that contain a small amount of liquid (1 to 2 cups), it takes about five minutes for the float valve to rise. For recipes with a lot of liquid, like soups, it can take up to 20 minutes for the float valve to rise.
Once the float valve rises into position, the Instant Pot display should switch from “On” to a countdown of the cook time.
(If “On” remains in the display for longer than a few minutes, there’s a problem. If this happens, turn off the machine. Release the pressure by turning the steam release valve to “venting.” Allow the steam to release. Once the float valve drops, it’s safe to open the pot.)
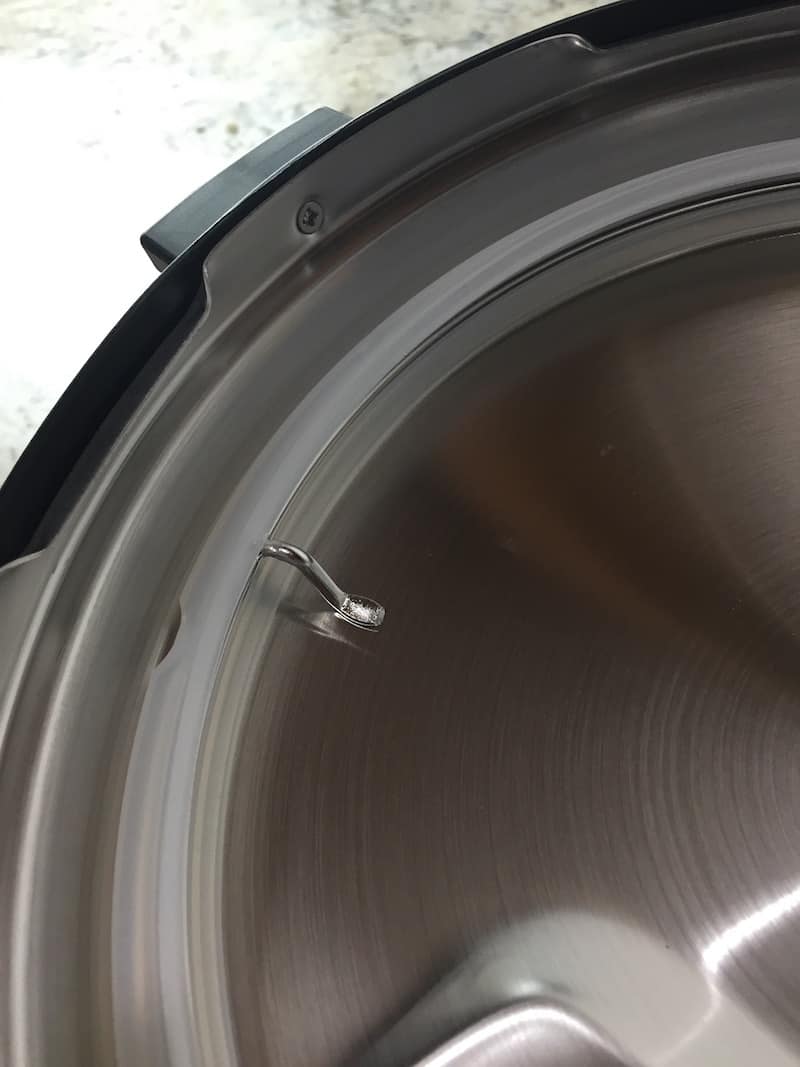
Underside of Lid: The Sealing Ring and Anti-Block Shield
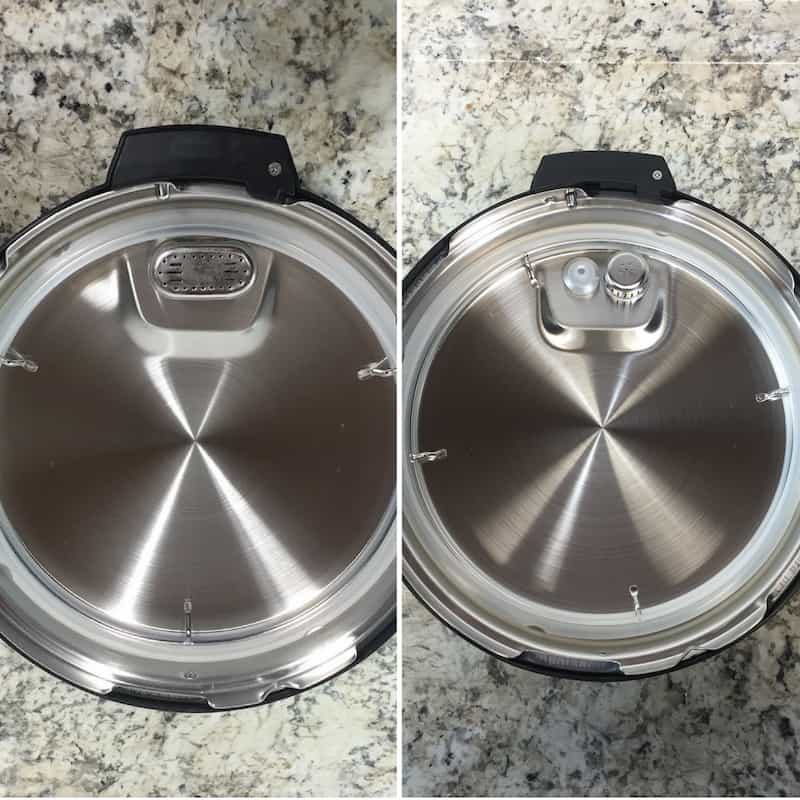
The underside of the Instant Pot contains four important parts. If you have version one DUO, it will look like the one of the left. If you have a version two DUO, it might look the one on the right. (I’ve seen a version two that came with a version one lid. So…flip your lid. Compare it to the picture above.)
The Sealing Ring
The plain-looking silicone ring is an integral part of the Instant Pot. Without it, pressure can’t build. During heating, the sealing ring expands to create a seal that allows pressure to safely build inside the machine. If the sealing ring isn’t inserted correctly or is torn, worn, or out of shape, steam can leak from the lid and the Instant Pot won’t seal.
Insert the sealing ring snugly in the wire sealing ring rack. When properly inserted, the sealing ring should lay flat against the lid and shouldn’t pull out easily if you give it a soft tug.
To remove the ring for cleaning, allow the lid to cool and then pull gently on the sealing ring.
To clean, use warm soapy water or run through the dishwasher. Dry the ring thoroughly before placing it back into the lid.
Even with thorough washing, the sealing ring can hold on to cooking odors. If you plan to make yogurt or desserts, like rice pudding, consider getting a second silicone sealing ring to use only for yogurt, desserts, and other mild foods. This way you’ll avoid making a rice pudding tastes like the chicken you made for dinner the night before.
Check the sealing ring before each use. To do this, run your finger along the ring to ensure that it’s in place. And when you wash it, give it a look. If you notice any flaws in the ring, replace it.
I like to keep an extra sealing ring on hand at all times. This way, if something happens, I can replace the ring right away.
The Anti-Block Shield
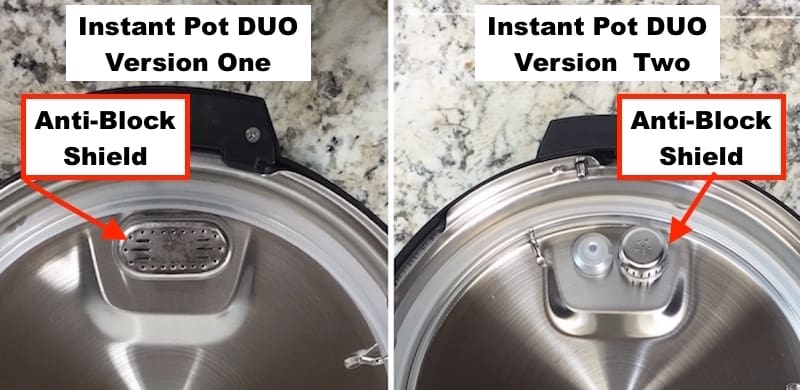
The anti-block shield prevents small foods and foam generated during cooking from clogging the pressure release valve and causing an unsafe amount of pressure to build. It’s an important piece. Don’t run your Instant Pot without it in place. Depending on whether you have a version one DUO or a version two, the shield will either look like a small oval cage covering both the float and pressure release valve or a small round piece just covering the pressure release valve.
(If you have a version one DUO covering the float valve, give the anti-block shield a forceful tug. It comes off for cleaning.)
Instant Pot Setup: Cooking Pot, Cord, and Condensation Collector
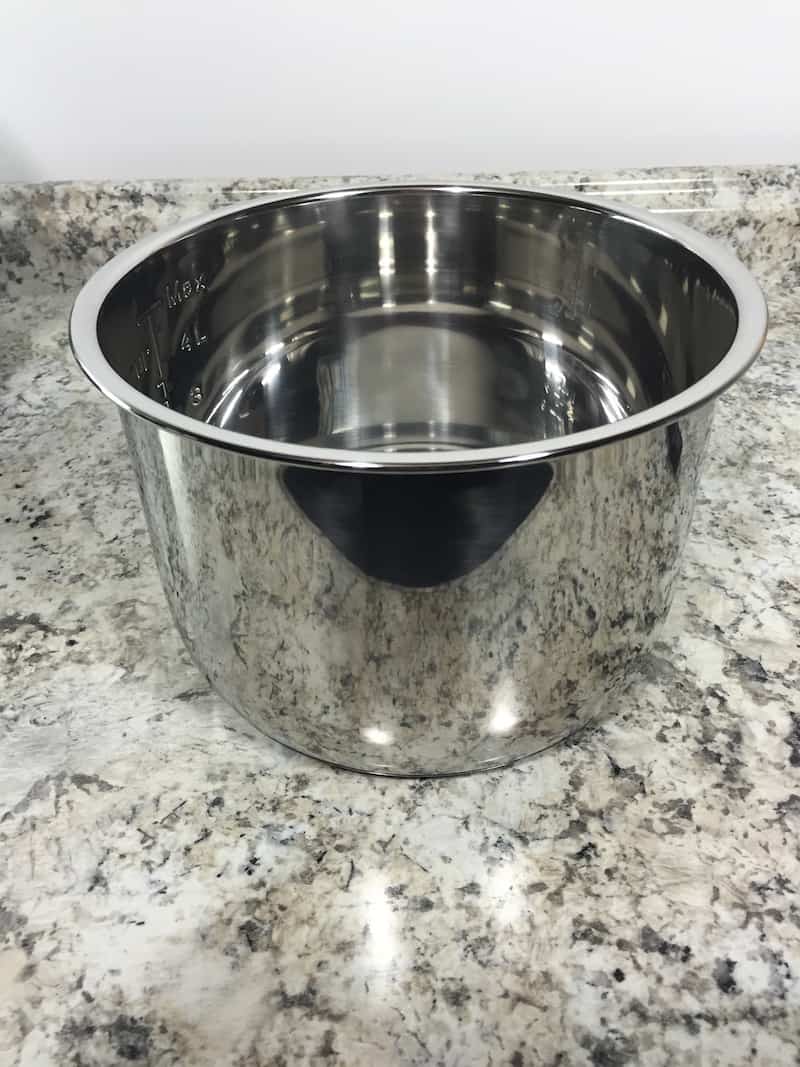
The cooking pot of the Instant Pot. This is where the cooking happens. You never want to run the Instant Pot without the insert in place.
With a three-ply bottom made of layers of stainless steel, aluminum, and stainless steel, the insert heats evenly. I love that doesn’t have a nonstick coating and that it handles sautéing really well.
There’s one problem with the Instant Pot cooking insert: the “max” fill lines markings are INCORRECT for pressure cooking.
When using the Instant Pot for pressure cooking, never fill the pot more than 2/3 full or 1/2 full if you’re making foods that release a lot of liquid. If a pressure cooker contains too much liquid, the hot liquid can spray out of the pressure release valve, causing severe burns. As long as you respect the maximum fill on a pressure cooker, you’ll be fine.
I find the markings to be very confusing and have reached out to Instant Pot to inquire why the “max” fill line is too high for pressure cooking, If I hear back, I’ll update this page.
To make cleanup easy, the insert is dishwasher safe. However, I tend to just add some soapy water and let it soak while we eat dinner. It wipes out easily even without a nonstick coating.
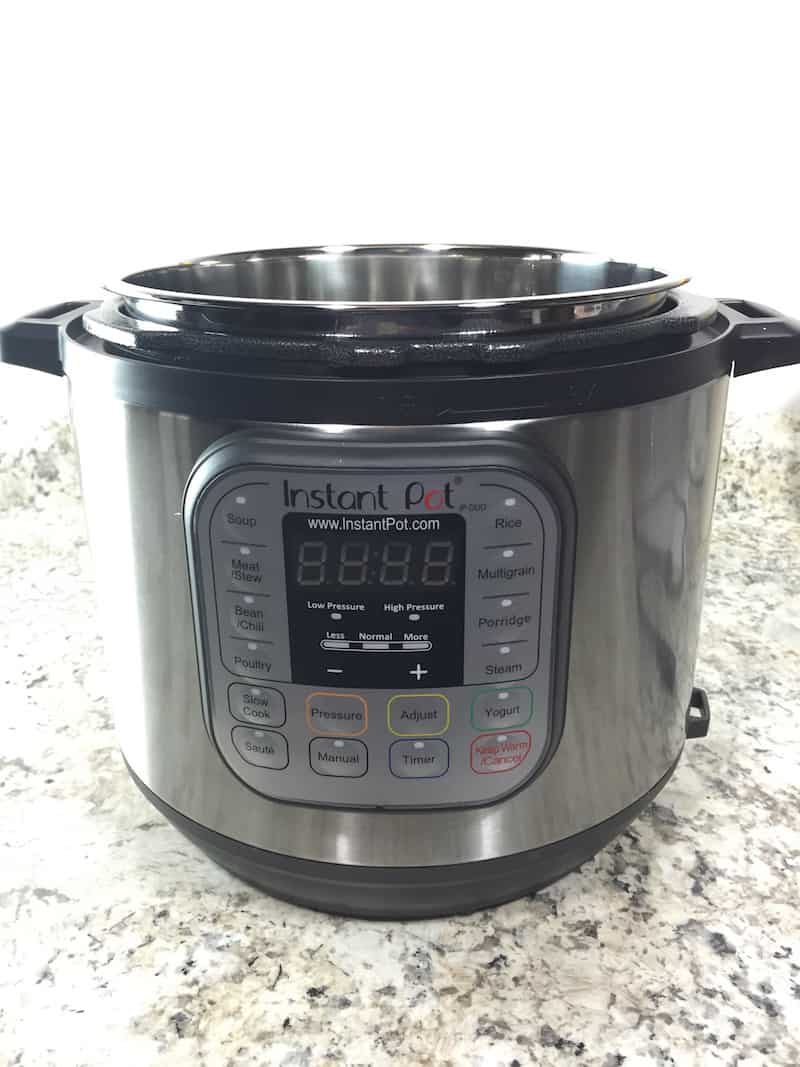
Ta-da! Here’s the Instant Pot with the Insert Pot in place. Now it’s time to conduct a “water test.” This trial run of the Instant Pot helps familiar you with how to lock the lid, set the pressure release valve, and complete a quick release of the pressure. It’s a helpful test and I recommend doing it before you cook anything in your Instant Pot.
But first…
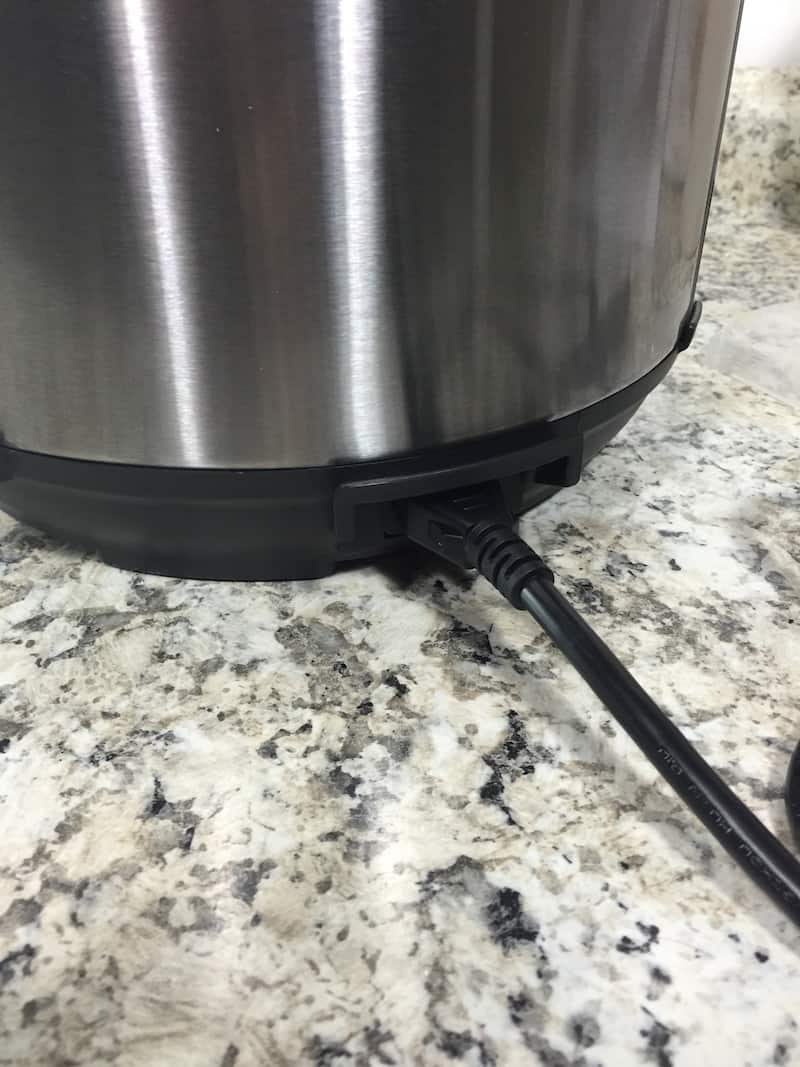
…insert the cord. In my experience, the pot doesn’t work well when it’s not plugged in. 😉 (Not all Instant Pot models have a detachable plug.)
Attaching the Condensation Collector
When you open the lid of the Instant Pot, some cooking liquid tends to run off the lid and into the rim that runs around the pot. It can be a pain to clean. To prevent this rim from overflowing with liquid, there’s a small hole in it. Under that hole, you can attach the “condensation collector.” Basically, a small cup that will hold excess liquid and prevent it from going all over your counter.
The condensation collector can be tough to install. You need to line it up with two slots and then push it toward the machine. To remove, pull it toward yourself.
With the cord and condensation collector installed, we can finally run the water test.
Instant Pot Water Test
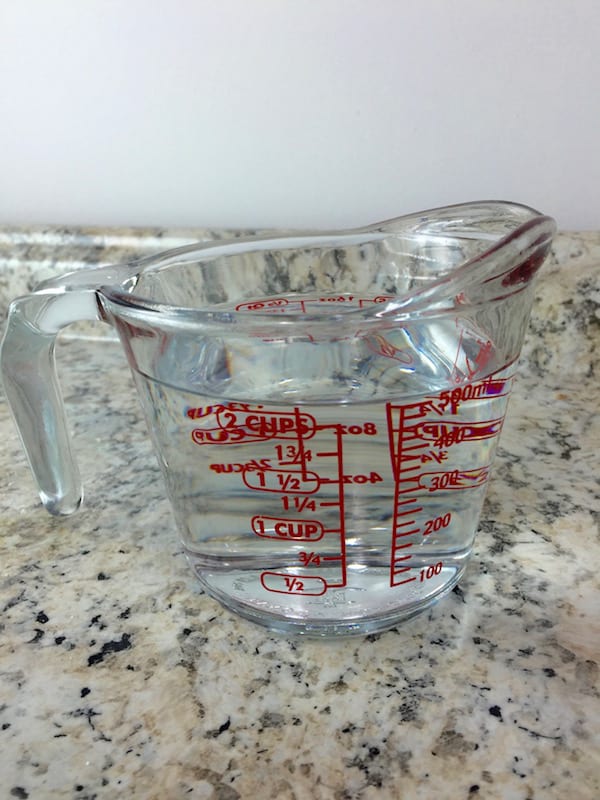
For the water test, you’ll need two cups of water. Regular cool water from the tap works just fine.
- Place insert into the Instant Pot.
- Pour 2 cups of water into the insert.
- Close the lid. It will chime when it’s closed correctly.
- Set the Pressure Release Valve to “sealing.”
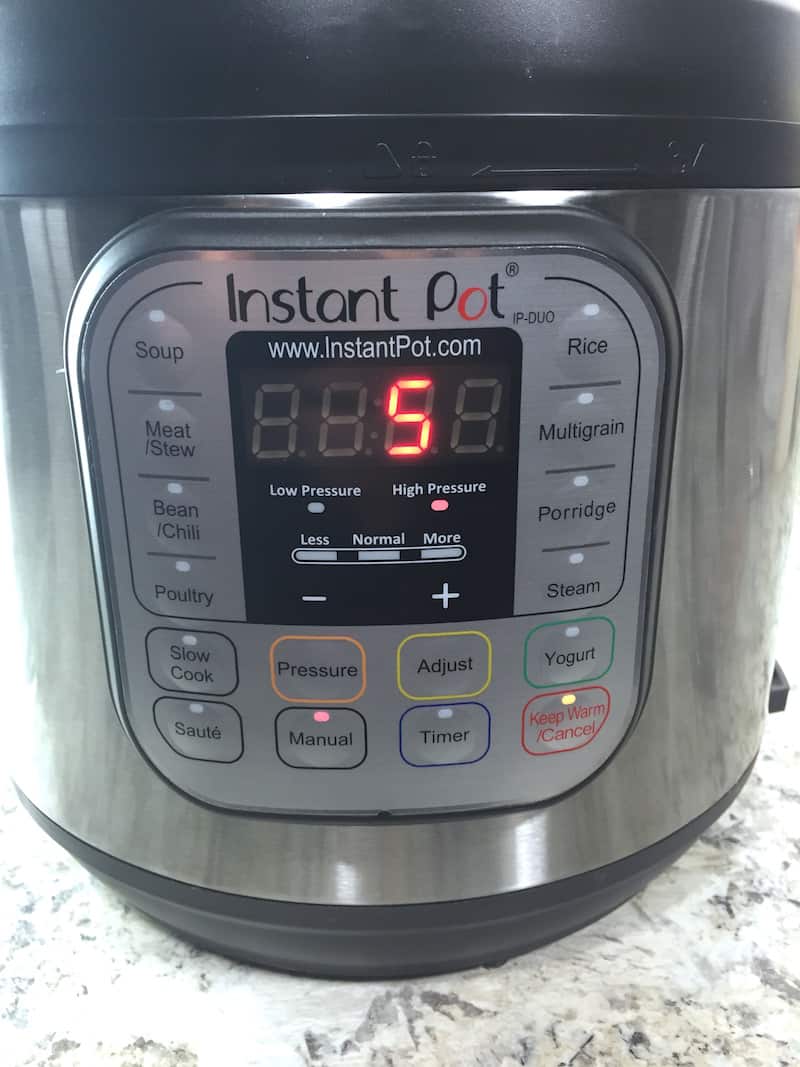
- Press Manual.
- Press the “-” button until 5 shows in the display. That’s it. The Instant Pot does not have a start button. After about 30 seconds, the machine will turn on. The display will switch from “5” (shown above) to “On.” The machine is now building pressure.
- After about five minutes, the float valve should lift into place. You shouldn’t see any steam leaking from the sides of the pot. Once the float valve seals the Instant Pot, the display will change from “On” to “5.”
- When the cook time completes, turn the pressure release valve to “venting.” This is called a quick release Be sure to keep your hands and face away from the top of the pressure release valve. Hot steam pours out of it. (see video below)
- Open the lid, away from your face, when the float valve drops.
- That’s it. You’ve completed the initial test of your Instant Pot!
Now that you’ve setup you’re ready to get cooking.
Why not start with one of these recipes?
INSTANT POT RECIPES TO TRY
Instant Pot Chicken Burrito Bowls The #1 recipe on this site. Try it and you’ll understand.
Pressure Cooker Mac and Cheese. So creamy. So dreamy!
Street Cart Curry Chicken. Loaded with flavor and SO easy.
Pumpkin Rice Pudding. We all need dessert, right?
suzanne says
I tried a barbecue chicken recipes that included carrots and onions, so, lots of water. When I opened the pot the chicken was done but there was a lot of liquid in the pot. What went wrong?
Elizabeth says
It’s hard for me to say without knowing what recipe you used. But that sounds fairly typical for pressure cooking. No steam escapes during cooking. So whatever liquid the ingredients released, stays in the pot. Hope this helps!
Rose says
Pressure cooking for the first time tonight…question: I’m making Beef Stew w liquid & veggies as well as 2 1/2 lbs angus stew beef.
I’ve locked lid, pressed pressure cook and 15 min. time entered. Question is, why is the KEEP WARD yellow light on? I hear things heating, so think its building pressure so, why is Keep Warm light on?
Elizabeth says
I’m not sure which model you have. It sounds like the keep warm setting is on and will turn on when the cooking cycle completes.
suzanne says
Also – loved your manual!!!
Barbara Metz says
Loved your commentary. Only thing missing for me was WTF, which I exclaimed when reading the “manual”. I also read the “recipe book” which I wanted to trash when I read the directions “turn the flame up to high”.?????
I think maybe I got a bogus instapot?
My front panel looks nothing like yours.
I would like to send you a picture before I send this off to Goodwill for someone else to figure out.
And while I am at Goodwill I will buy and old fashioned plain and simple -Slow Cooker! Can I send you a picture. I think it will make you laugh. There is no ON or OFF. Only a list of foods. None of them I am interested in making. Thanks for doing this work. Barbara Metz.
Heather says
This guide is fantastic! Very to-the-point, clear and helpful. Looking forward to trying some of your recipes!
Cayce N Webster says
This was so much more helpful than the manual that came with my instant pot!! Thank you so much for sharing.
Meredith Clifton says
My Instant Pot did not come with a condensation collector . Help!!
Elizabeth says
I’d contact the company.
Brittney says
I didn’t think mine did either. However, upon further review I noticed it was wrapped up in the plastic (it’s clear) so I didn’t see it. Also, the owner’s manual is terrible!
Nancy Hindenburg says
Mine didn’t come with condensation collector either?
ShelbyJune says
Looking forward to trying my instant pot after reading your instructions. I have “mislaid” those that came with the pot and I have recipes to try! You were very detailed but concise; I’m not as afraid of it now. Thank you!!
Cynrhia says
I have the duo60-v3. My recipe says topick manual for 5 minutes at high pressure. Do I just pick pressure cook then hit – until it hits 5? Then it says to natural release for 10.
Elizabeth says
Yes. On the newer models, the button says “pressure cook” instead of manual.
Wendy Russell says
I just got my new Instapot and it did not include the recipe books, the Quick Reference Guide, measuring cup, soup spoon, or rice paddle. I did receive the condensation hookup.
Anne B says
Directions are great, but Mine doesn’t have a “manual” button.
Elizabeth says
What’s your model? There are so many different ones now.
Naomi says
Just bought an instant pot Duo. Inside box was a red gasket. No instructions. Is this an extra gasket or is it supposed to be installed with the clear one? Can’t see how.
Elizabeth says
Only one gasket is used at a time. The red gasket is a spare.
Connie says
This was just what I needed. Got an Instant pot for Christmas, really excited until I opened it and read the manual. So glad I found your site! I’m excited again!
Marcelle says
Elizabeth, thank you for this page. I just received an instant pot and like the other comments, there was a lack of instructions with the pot.
Elizabeth says
I’m so glad it helped!
Ken B says
Hi, thank you for sharing all your insights. We did our first meal yesterday an Oxtail Stew. With the natural release we waited 45 minutes and the pressure indicator hadn’t dropped so i used we the manual release. I had read that the Natural Release shouldn’t take more than 10 minutes. Any ideas?
Elizabeth says
Hi Ken,
Natural release tends to vary depending on how full the pressure cooker is with liquid. It’s very normal for a natural release to take over 30 minutes. The more liquid, the longer it takes.
I hope this helps! And I hope you enjoyed the oxtail. It sounds yummy!
Marijane says
I’m having trouble setting the cook time on my instant pot duo ultra mini
Cooking soup and when I try to adjust time by pushing the knob it switches from o to 30 min and won’t let me adjust
Elizabeth says
I’d reach out to the manufacturer about this issue.
Michelle says
So helpful thank you!